
I often find myself faced with a puzzled look whenever I ask one of my students —or even professional photographers— “What does your histogram look like”. Almost everyone who has taken a photograph in the digital age has seen these mysterious objects. Many quickly dismiss them as superfluous bits of useless fluff that are only a part of that tech realm that doesn’t really apply to the task of making an image. Nothing could be farther from the truth.
Histograms are in fact solutions to one of the basic problems photographers often face: Our eyes can deceive us —sometimes badly. Have you ever gone from a pitch black environment, and turned on your cell phone; lit a match or lighter; or been subjected to someone turning on the cars headlights, and suddenly finding yourself temporarily blinded? This kind of thing happens in photography all the time. I’ve taken pictures at night, or just before dawn and thought my images look great on my camera’s LCD —until I open them later on my computer and realize they’re all hopelessly underexposed, or worse still blown out in part of my image. Enter the histogram. This is one of the best ways to know exactly, mathematically, the brightness of your pixels. So, let’s dive in and try to demystify this powerful tool.
WHAT EXACTLY IS A HISTOGRAM?
For me, understanding histograms came easy. I didn’t set out to become a photojournalist. I actually studied quantitative analysis at Cambridge University and was on a fast track to spending a lifetime stuck in an office somewhere analyzing histograms for entirely different reasons (this of course is another story completely). However, to put it succinctly histograms are visual representations of frequency distributions. Confused yet? Don’t worry, I’ll explain.
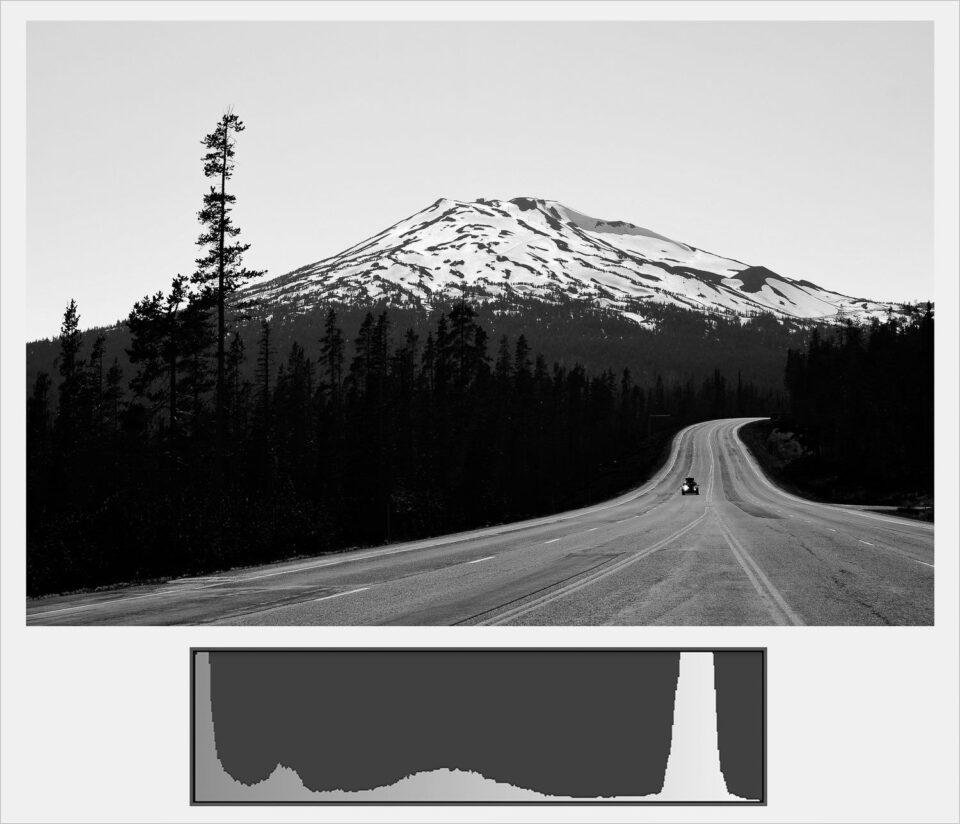
For as long as mankind has been collecting data they have been analyzing it and trying to make sense of it in a clear and concise manner. Visualizing data through representative means is a fast and easy way to understand what the underlying data is telling us. When it comes to photography, histograms are a great way to quickly visualize what your camera’s sensor is “seeing”. After all, your camera’s sensor is nothing more than a data collecting device. That data is assembled and presented to us in the form an image made up of pixels, and the histogram is a graph that visually tell us exactly what the sensor has collected. Specifically brightness or colour. This is extremely useful in situations where it might not be a great idea to completely trust your eyes. There is nothing worse than making a monumental effort to get to a location you want to shoot, have the conditions be absolutely the best you could possibly hope for, only to get back home to discover that your image is horribly blown out or hopelessly underexposed. It is just not necessary to rely on your eyes to tell the brightness of your image; you can get a more objective and clear understanding by looking at the histogram. Let’s take a look at a sample photo paired with its histogram:
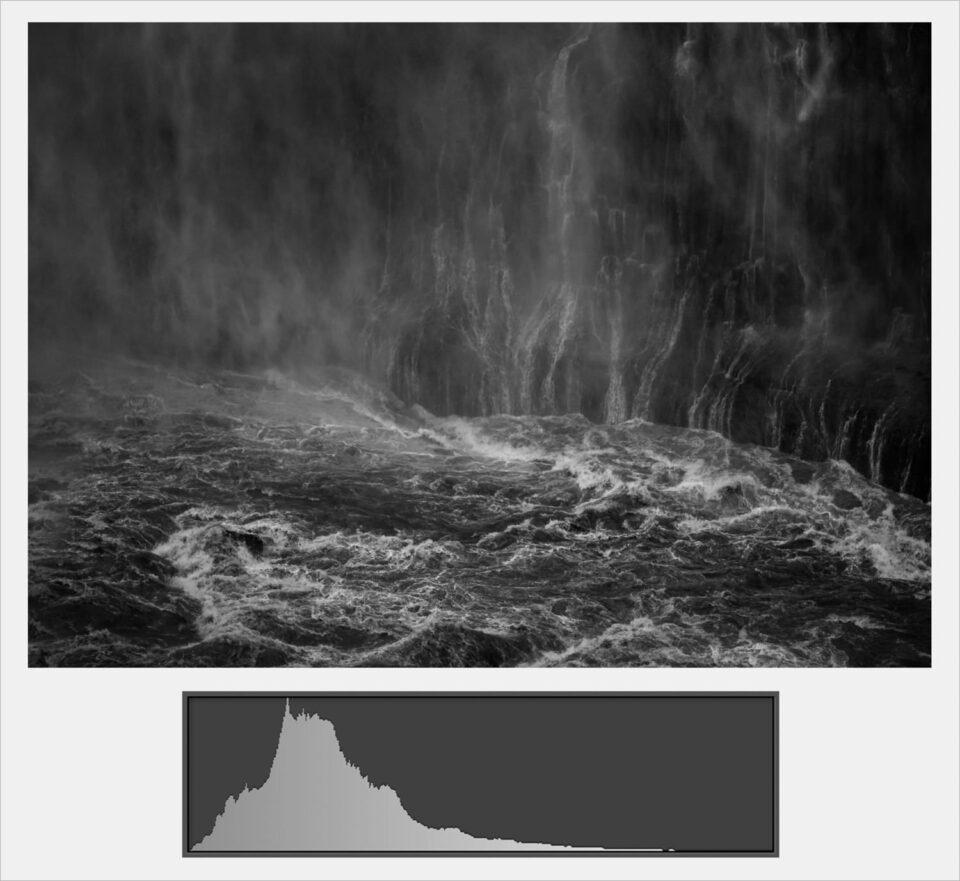
The histogram of a dark image.
Clearly this is an example of a very dark image. In the histogram below it we see that there is a heavy concentration —or shifting— to the left side of the histogram. Remember that I told you that a histogram was a graph of frequency distribution of the underlying data. In this example the distribution is heavily skewed to the left, or the dark portion of the histogram. Here’s another example:
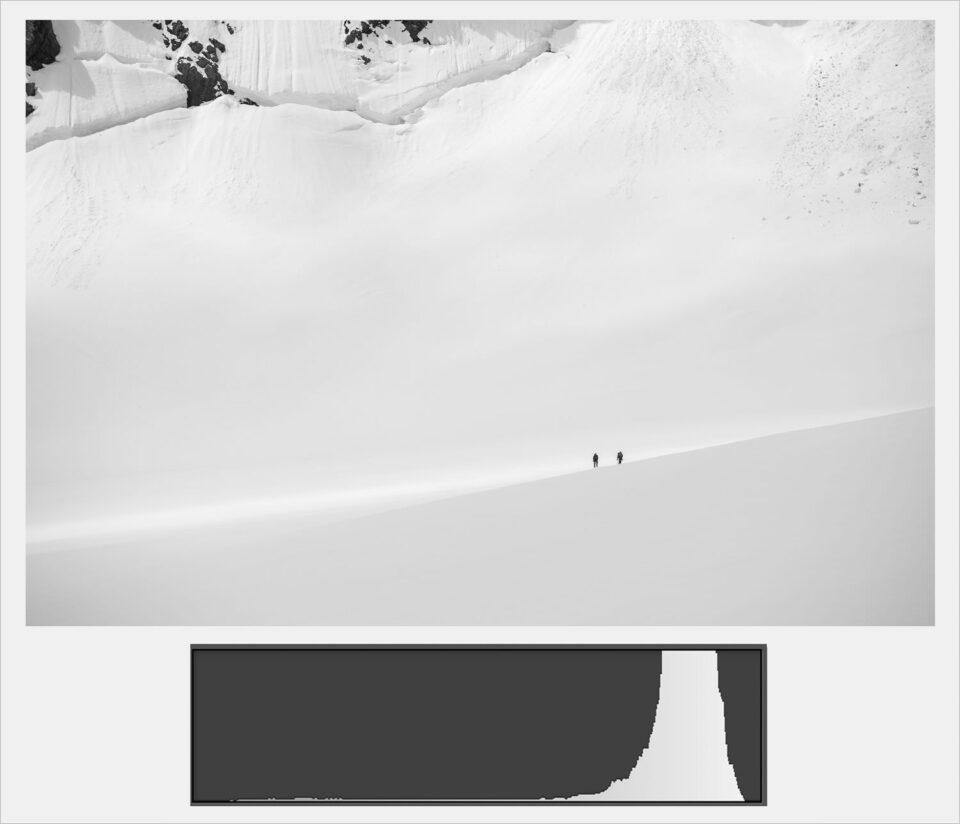
The histogram of a bright image.
In this image we have an example of a very bright image. We also see in the corresponding histogram that the data is very heavily concentrated of on the right. Moving left to right histograms represent dark pixels collected to light pixels collected. The up and down representation is the frequency —or amount— of pixels collected at a particular value or level of black, white or shade in between. Let’s look at a more even distribution:
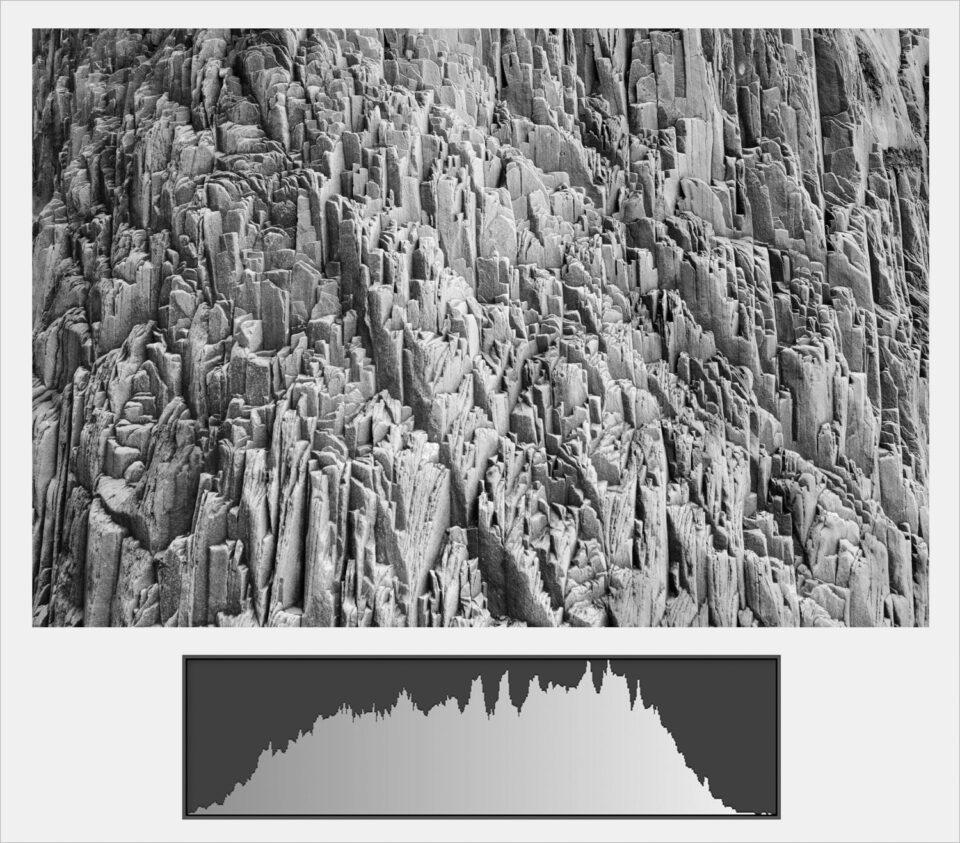
The histogram or an even distribution or more balanced image.
The photograph above is what I like to refer to as a Goldilocks shot. It’s not too dark nor is it too bright; it’s somewhere in the middle. This simply means that a majority of the pixels are considered “normal” in brightness. Therefore the histogram is approximately centered. Are we starting to see the picture? Let’s review:
- Dark photo: Leftward histogram
- Bright photo: Rightward histogram
- Balanced photo: Centered histogram
Essentially a histogram is laid out as follows:
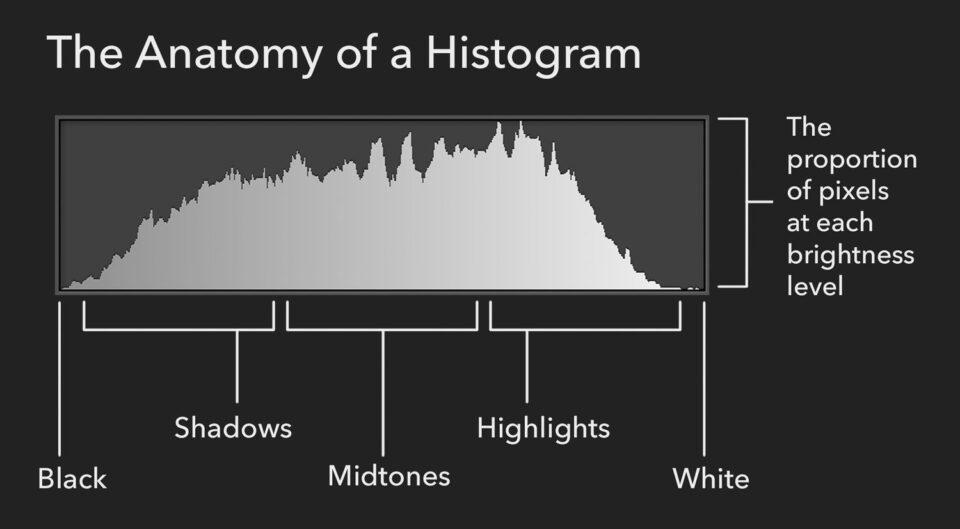
So, histograms are a graph of the brightness of each pixel in your photo, arranged from dark to light. They are a useful way to visualize how bright your photo is in an objective way. Also, you’ve probably noticed that all the photos so far are black-and-white. That’s because color histograms have a bit more information, and they take some extra effort to understand (although they’re still pretty easy, as I’ll cover in a moment).
OTHER THINGS TO CONSIDER?
Aside from what I mentioned earlier —histograms being beneficial under dark shooting conditions— there are some other reasons to depend upon your histogram. Primary, your histogram is one of the best ways to figure out if you’ve lost details in the highlights or shadows of your image.
This should be fairly easy to understand: If you find that there are pixels to extreme left or right of the histogram —black or white— then you are losing information in your photograph. In the image below, you can tell that there is lost details in the highlights, since the histogram has a tall column on the far right:
This image is very overexposed and recovering some of the details in the sky will be impossible. That’s easy to see by looking at the tall column on the very right-hand side of the histogram.
We have the opposite situation in this image which has areas that are totally black:
In this image, we find details in the trees that are totally black, meaning that recovering those details is just not possible. By examining the histogram, you will notice the tall column touching the left-hand side of it.
When you’re out on a shooting day, and you want to make sure you’re not losing important details in your image, check your histogram. If you find part of the histogram is touching the very far extreme, you’ve potentially lost detail in that region. I’ve been shooting for almost fifty years —half of those in the digital era— and I use histograms all the time to guarantee that I’m exposing properly, with particular focus paid to overexposure of my image (Overexposed areas of pure white are impossible to recover, while it can be possible to bring back shadow areas even when they look almost completely black).
HOW TO USE HISTOGRAMS
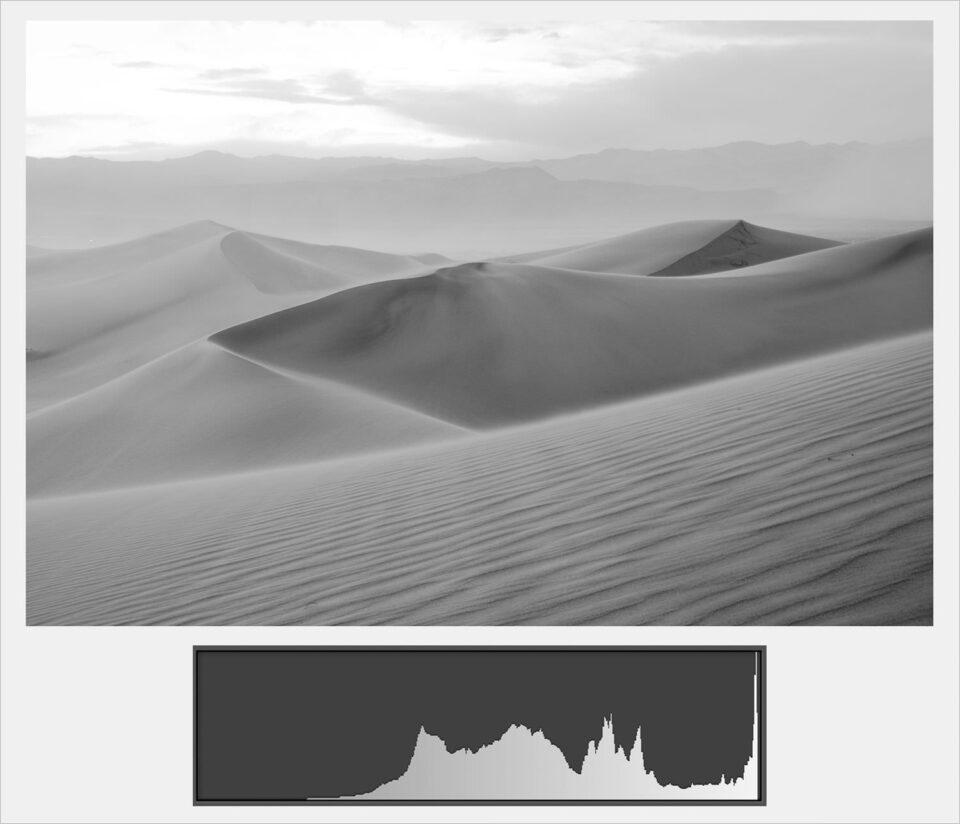
It’s very easy to use histograms properly. In fact, you don’t need to look at most of the histogram. Focus your attention only on the right-hand side of the histogram, where the bright tones appear. Ask yourself if anything is overexposed (which would appear as a column touching the right-hand side). For example, in the histogram from the sand dunes photo above: You can tell from the histogram that the photo is overexposed. You don’t even need to look at the image itself to realize that. Because of the tall column up against the right-hand side, you can deduce that certain parts of the image are completely white. Not good.
Having a column on the very righthand side isn’t always a problem. For example, if the sun is in your photo, it should be completely white in the center. However, tread carefully. In most cases, it’s something to avoid, especially if more than a small handful of pixels are completely overexposed.
Side Note:
Your pixels have to be completely white before it’s impossible to recover highlight detail. Normal highlight regions? They’re perfectly fine and easy to recover, so long as nothing is 100% white.
The most important thing is to avoid blowing out any highlights. If you make that mistake, there’s no easy post-processing fix. That’s why I like histograms so much — they make it easy to know for sure if any highlight detail in an image is gone.
LET'S TALK ABOUT COLOUR
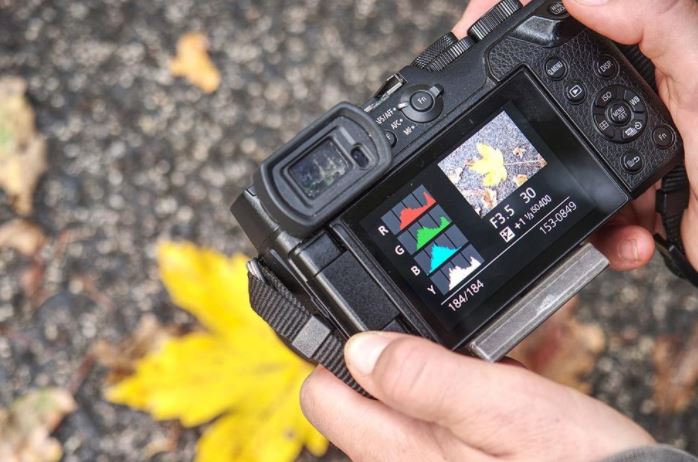
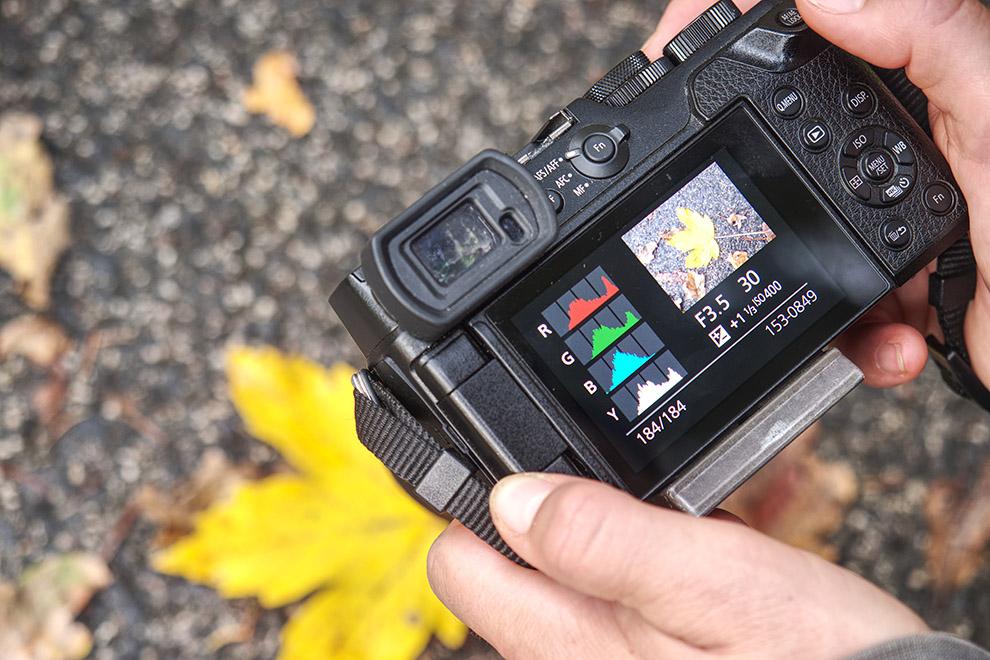
The histograms that we’ve looked at so far are completely accurate, but they’ve only been about black and white images. In color photography, histograms get a bit more complex. That’s because your camera sensor has red, green, and blue photosites within every pixel. So, naturally, a color histogram has red, green, and blue components. Here’s an example photo paired with its histogram:
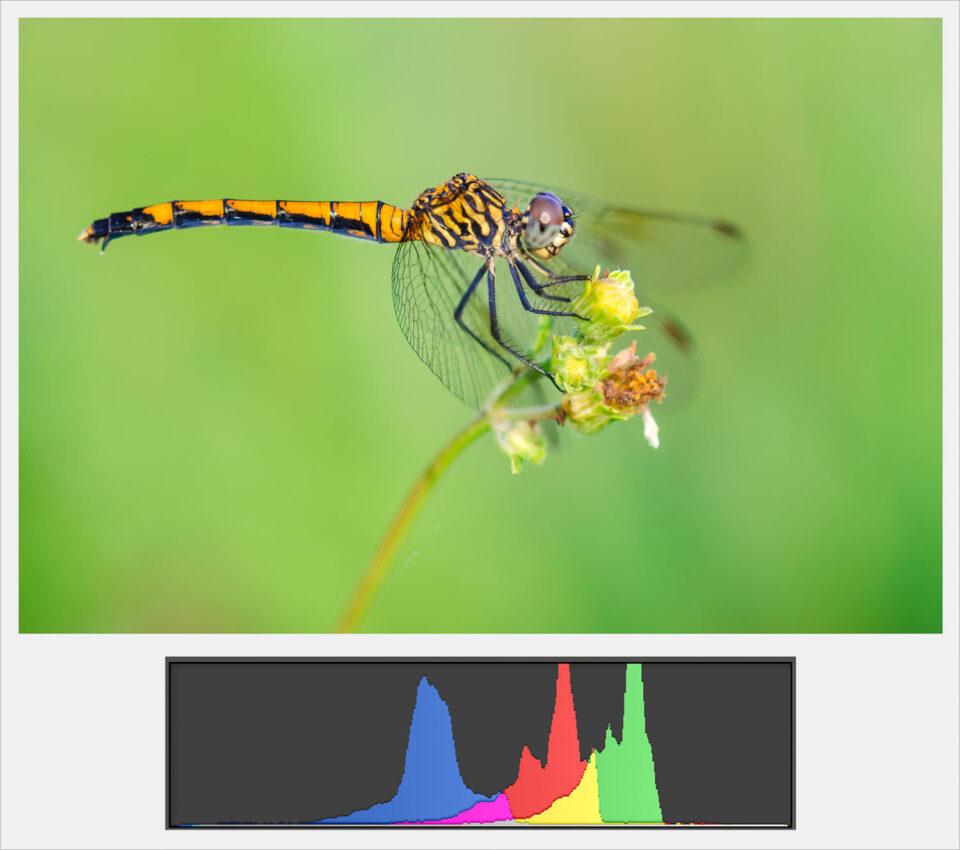
(The magenta and yellow regions just mean that two of the color histograms are overlapping.)
This leads to an interesting result: You can lose information in one color without losing information in the others. For example, you might have a very bright photo where some of the blue channel is overexposed, but the red channel and green channel are fine, like the image below. Is that a problem?
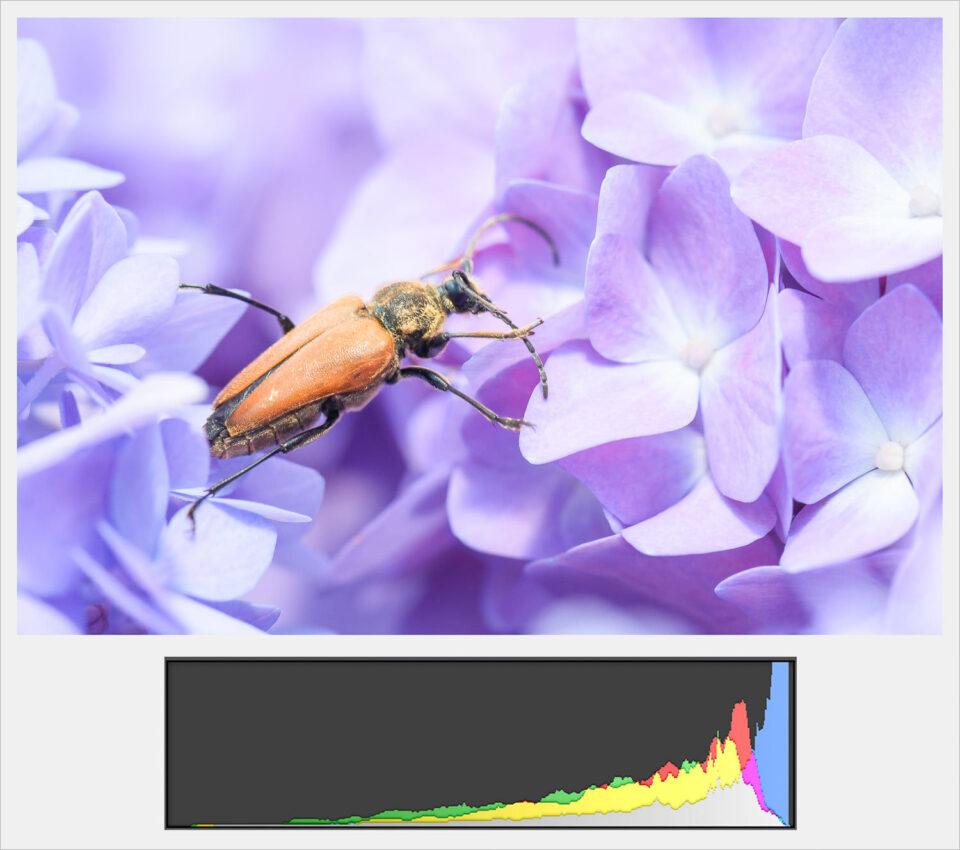
Yes, that is a problem! It means you’ll be able to recover some highlight information, but the colors in your highlights won’t look quite right when you do. They’ll shift in strange directions, because you’ve lost a lot of blue information.
Overexposing just one of the three color channels is nearly as bad as overexposing all of them.
Luckily, most cameras let you see all the color histograms at once, so you aren’t flying blind. You’ll want to enable this feature (otherwise, the camera might just show a monochromatic histogram by default, which isn’t very precise).
AN IMPORTANT NOTE ABOUT JPEG HISTOGRAMS
Any discussion about histograms would not be complete without mentioning one caveat: As helpful as they are, they typically don’t reflect the complete set of RAW data that most cameras can capture. In other words, it’s possible that your histogram might be telling you that a highlight is blown out, but you actually can recover the data without issue — sometimes just barely — in post-processing software like Photoshop or Lightroom.
The reason is that cameras display the histogram based upon your camera’s JPEG settings, even when you’re shooting RAW files. So, if your JPEG settings include extreme contrast and vibrant colors, your histogram may say that you’ve overexposed a highlight long before you’ve actually lost data in the RAW file.
For most photographers, my recommendation is simply to leave your JPEG settings — called Picture Control settings, Creative Style settings, etc. — set to “boring” values that don’t add much contrast or saturation. Personally, I just use Camera Standard with contrast and saturation set to zero.
IN CONCLUSION
It’s a simple fact that you can’t trust your eyes to be perfectly accurate. You can’t trust the camera’s LCD, either — and with histograms, you don’t need to. The only important thing is to know how to read them. Once you understand how to read a histogram, you’ll be at a huge advantage in photography. You won’t end up overexposing or underexposing an image by accident, since you’ll already know how bright it is.
Personally, I use histograms a lot. The same is true for almost every photographer I know. They’re a great tool, and one that is worth learning how to use properly.